Hello again gentle readers... or crickets. Ok, honestly, I'm writing this for myself. So let's try that again.
Dear Diary,
I promised I would create some posts that tell of the work I have done at Tanglewood in the first 3 years of my ownership. There have been many little changes, but the most dramatic changes have been in the Kitchen, which is the most almost done room in the house now. (It's not quite done, but what space really is?)
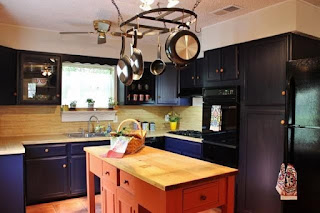
so let's start with a before! It's not a terrible kitchen, the layout is good. The island (which is actually a floating piece of furniture) is super functional. The cabinets have been boldly painted a dark navy blue. I have to give the previous owner (let's call her SD, since those are her initials) credit in at least it isn't a predictable color like white or brown? the counters and back splash were a printed laminate that was supposed to look like butcher block... but didn't. The ceiling is popcorn and is adorned with a weirdly placed ceiling fan, a hanging pot rack, and a single 3 arm halogen light fixture which put out intense light and heat in any 3 spots you wanted to point it at. the corners are dark and moody... and not in a good away. All of these things would eventually be addressed, but one thing at a time. (the basket is staging from before i moved in). I also hated the cute country trim framing the window.

 Ok first thing to go was that pot rack. I know, i know, but hear me out. Some people love pot racks. Those people are usually less than 5'8" tall. I'm a solid 6 footer, and those pots were in my way. Also, it was hung with chains. Without a rigid hanging system, a pot rack has to be balanced. So you take your favorite skillet down to prepare a nice meal and the saucepan on the opposite side swings down and clocks you in the back of the head. Hypothetically. taking it down was a 5 minute task. Selling it on craigslist added another half day.
Task # 2, which is more blog worthy... microwave. Judge if you want, but I like to use a microwave. I also eat meat and occasionally purchase leather goods. There's decent counter space but no where I want to give up to a microwave. My apartment living days got me used to an above the range MW, which is apparently out of style but oh so convenient. My birthday/housewarming gift from my parents was the MW, but I had to make it fit myself.... As you can see that meant chopping up the cabinets. I don't feel guilty as these cabinets are recycled. (lots of evidence that they were moved from another kitchen to be put here, possibly they were in the original kitchen on the other side of the house, but I have no way to verify). There's also a weird gap between the counter over the range and the tall cabinet to the right. (see photo)
Ok first thing to go was that pot rack. I know, i know, but hear me out. Some people love pot racks. Those people are usually less than 5'8" tall. I'm a solid 6 footer, and those pots were in my way. Also, it was hung with chains. Without a rigid hanging system, a pot rack has to be balanced. So you take your favorite skillet down to prepare a nice meal and the saucepan on the opposite side swings down and clocks you in the back of the head. Hypothetically. taking it down was a 5 minute task. Selling it on craigslist added another half day.
Task # 2, which is more blog worthy... microwave. Judge if you want, but I like to use a microwave. I also eat meat and occasionally purchase leather goods. There's decent counter space but no where I want to give up to a microwave. My apartment living days got me used to an above the range MW, which is apparently out of style but oh so convenient. My birthday/housewarming gift from my parents was the MW, but I had to make it fit myself.... As you can see that meant chopping up the cabinets. I don't feel guilty as these cabinets are recycled. (lots of evidence that they were moved from another kitchen to be put here, possibly they were in the original kitchen on the other side of the house, but I have no way to verify). There's also a weird gap between the counter over the range and the tall cabinet to the right. (see photo)
 But of course the biggest problem is cabinet height. If i put my microwave under this cabinet, it would touch the range!.
Firstly, I removed the old range light/hood and did some measuring. How high did I need the top of the MW to be so the bottom would be in the right place? Then i had to measure space for a 30" wide microwave centered. I marked my cut lines with painters tape, since the painted cabinets were so dark. I needed to be able to see it with my safety glasses on.
But of course the biggest problem is cabinet height. If i put my microwave under this cabinet, it would touch the range!.
Firstly, I removed the old range light/hood and did some measuring. How high did I need the top of the MW to be so the bottom would be in the right place? Then i had to measure space for a 30" wide microwave centered. I marked my cut lines with painters tape, since the painted cabinets were so dark. I needed to be able to see it with my safety glasses on.

 The wires you see are for the old range hood light. They are safely capped with wire nuts for the time being, they will be dealt with, promise!
My cutting meant I had to lose the floor of the cabinet and part of the face frame. I rebuilt the bottom with 1x2s and plywood. Fortunately SD left me a ton of paint in the garage that matched pretty much anything she painted, so I was able to paint my not so artful carpentry work to blend in.
The wires you see are for the old range hood light. They are safely capped with wire nuts for the time being, they will be dealt with, promise!
My cutting meant I had to lose the floor of the cabinet and part of the face frame. I rebuilt the bottom with 1x2s and plywood. Fortunately SD left me a ton of paint in the garage that matched pretty much anything she painted, so I was able to paint my not so artful carpentry work to blend in.

 At this point, i did bring in a professional, a friend who is a licensed electrician, to run a new circuit into this cabinet to plug in the microwave; it needs it's own circuit by code and also to prevent constant breaker flipping. He also properly removed the wires for the old light, since I didn't need them. I had a couple of little electrical projects i needed done and he works for a very reasonable rate. I would NEVER suggest that friends should do professional work for free, but I do believe in maintaining a file of skilled friends who charge less than a large business might. I also find independent tradesmen are better listeners if you want to do something unusual and are more flexible in their scheduling. Back to me!
Once the cabinet and wiring were set, it's a matter of finding the studs, screwing a bracket to the wall and pre-drilling holes in the bottom of the cabinet for the front mounting hardware. The MW is installed by hooking the back of the MW on the bracket and putting screws down through the cabinet floor into the top of microwave. The instructions recommend having an assistant for this, but one pig-headed homeowner with no regard for his own chiropractic health can pull it off.
At this point, i did bring in a professional, a friend who is a licensed electrician, to run a new circuit into this cabinet to plug in the microwave; it needs it's own circuit by code and also to prevent constant breaker flipping. He also properly removed the wires for the old light, since I didn't need them. I had a couple of little electrical projects i needed done and he works for a very reasonable rate. I would NEVER suggest that friends should do professional work for free, but I do believe in maintaining a file of skilled friends who charge less than a large business might. I also find independent tradesmen are better listeners if you want to do something unusual and are more flexible in their scheduling. Back to me!
Once the cabinet and wiring were set, it's a matter of finding the studs, screwing a bracket to the wall and pre-drilling holes in the bottom of the cabinet for the front mounting hardware. The MW is installed by hooking the back of the MW on the bracket and putting screws down through the cabinet floor into the top of microwave. The instructions recommend having an assistant for this, but one pig-headed homeowner with no regard for his own chiropractic health can pull it off.
 (Do not as I say, nor as I do! I take no responsibility. Seriously, my people are known for stubbornly doing alone what sensible people do with helpers, it's a lifestyle you must be born into.)
I lived with this open cabinet arrangement for a week or two. The microwave has a built in range light and vent fan (recirculating) so it really helps with the dark kitchen corner and cooking. But eventually, I needed doors back on these cabinets. OF COURSE I didn't throw away the doors. The doors were measured, cut apart using a circular saw and re-joined smaller using a Kreg jig. The cut seam had to be placed so it lined up with the frame and wouldn't require putting the inset panel back together (no way to hide that cut). Then copious amounts of wood filler, sanding and painting... Finished doors. I have to say, if you didn't know they were cut down, you probably wouldn't clock it. I'm not the best at detail work, so that made me pretty satisfied with myself.


 Almost, but not quite done (you may have noticed, I changed the cabinet knobs too, somewhere in the middle of all this work). I still had a 3 inch space between the now mounted microwave and the tall cabinet to the right. A space without a reason. It made me feel weird. So, I hacked together a reason for it. I put a plywood floor on the space and mounted a pull out spice rack in there. Some painted baseboard fills in as a cabinet panel.


I lived with this open cabinet arrangement for a week or two. The microwave has a built in range light and vent fan (recirculating) so it really helps with the dark kitchen corner and cooking. But eventually, I needed doors back on these cabinets. OF COURSE I didn't throw away the doors. The doors were measured, cut apart using a circular saw and re-joined smaller using a Kreg jig. The cut seam had to be placed so it lined up with the frame and wouldn't require putting the inset panel back together (no way to hide that cut). Then copious amounts of wood filler, sanding and painting... Finished doors. I have to say, if you didn't know they were cut down, you probably wouldn't clock it. I'm not the best at detail work, so that made me pretty satisfied with myself.


Comments
Post a Comment